![2617210b577d672136104a4f5660e04f07acf843-removebg-preview.png]](https://help.knowledgeanywhere.com/hs-fs/hubfs/2617210b577d672136104a4f5660e04f07acf843-removebg-preview.png?height=40&name=2617210b577d672136104a4f5660e04f07acf843-removebg-preview.png)
To create or edit courses in Studio, a user must have Developer or Editor administration rights and Studio license assigned to them. For details, see the discussion of administrative rights in Course Studio - Workflow.
Table of Contents
- Create the Course
- Enter Basic Course Information
- Choose How to Start Building
- Basing Your Outline on a Template
- Building and Editing Your Outline
- Build Your Pages
- Add an Assessment
- Set Completion Criteria
1. Create the Course
To get started:
-
Navigate to the Courses section of your admin panel.
-
Select Add Course.
-
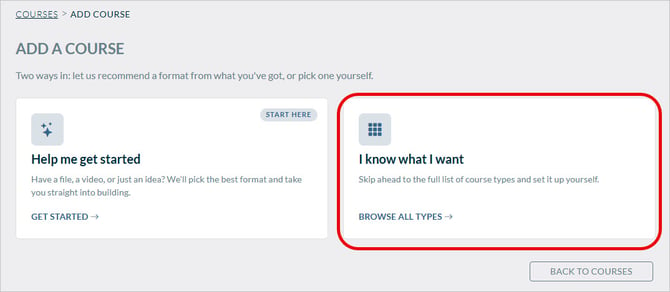
You will be prompted to select how you want to create the course. Since your intention is to build a Studio course, select I know what I want.
-
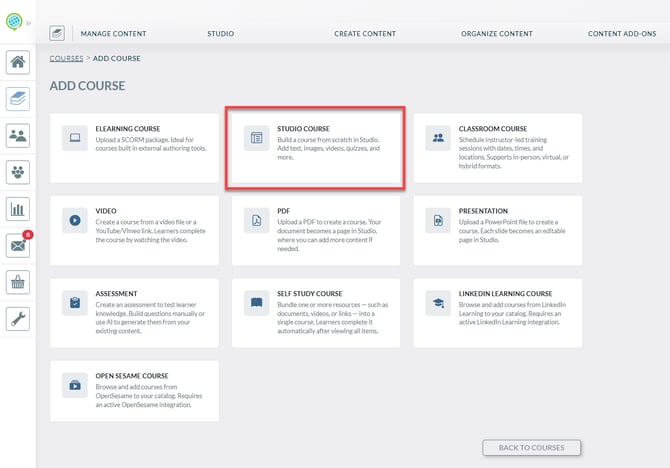
Select Studio Course to build your content directly within the LMS using Course Studio. If this option is grayed out, verify your license status.
2. Enter Basic Course Information
Once you have selected Studio Course, you will be taken to the LMS course setup screen.
-
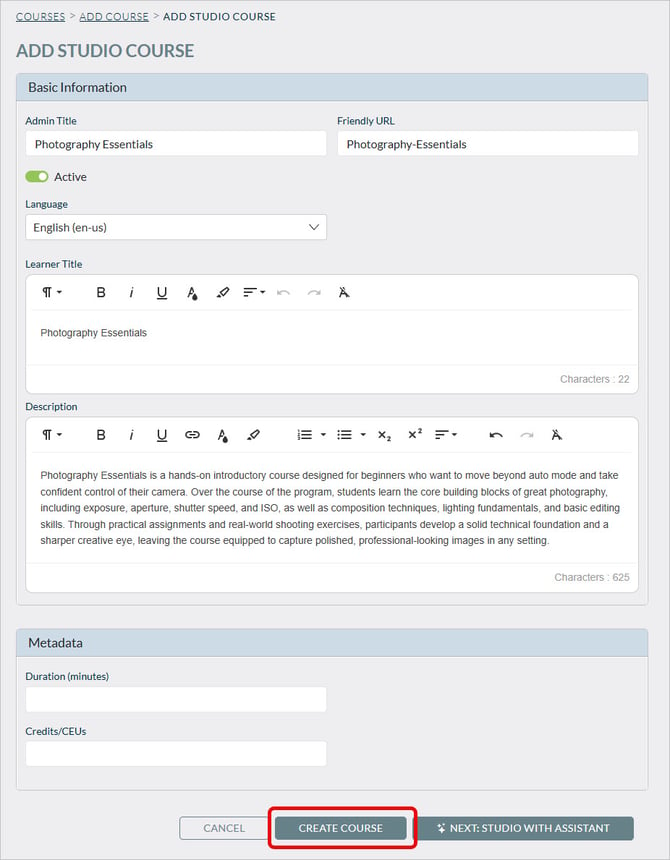
Enter the foundational details about your course, including:
-
- Course Title(s) - The name Learners will see in the catalog and on their dashboard. The Admin Title, Friendly URL, and Learner Title will all default to whatever is entered in the Admin Title, and can be different
-
- Description - A summary of what the course covers. This appears on the course detail page and helps Learners understand what to expect.
- Tags - Keywords that improve searchability within the platform.
- Duration - In minutes, how long the course is.
-
You will need to enter a course title, at a minimum, before you can proceed. You can always come back and update this information later, so do not feel the need to have everything finalized before moving forward.
- Click Create Course.
3. Choose How to Start Building
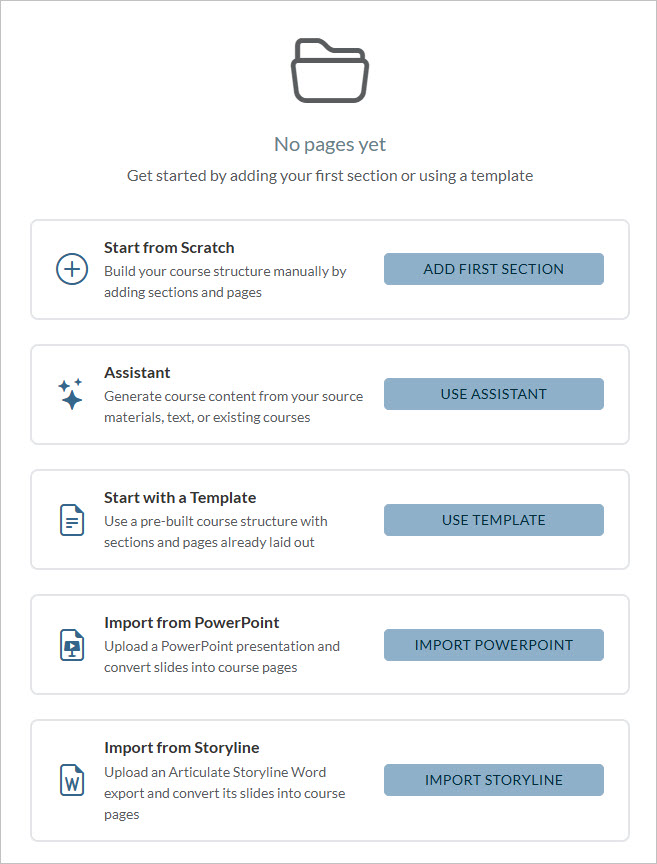
After saving your course details, you will be brought into Course Studio, the authoring environment where your course content lives. Before you start adding pages, you will choose how you want to structure your course.
- Start from Scratch - Build your course structure manually by adding sections and pages. Select this option if you want to start with an empty outline and build the course you need.
- ✨Assistant - Generate course content from your source materials, text, or existing courses. Select this option if you want to use Studio Assistant AI's features to assist you in building the course. Assistant AI for Studio license required. For information on Studio Assistant, see Course Studio - Building a Course Using Assistant AI for Studio.
- Start with a Template - Use a pre-built course structure with sections and pages already laid out. Select this option if one of Studio's pre-built templates is suitable for your course.
- Import from PowerPoint - Upload a PowerPoint presentation and convert slides into course pages. Select this option if you would like to base your course on an existing PowerPoint presentation. For information on PowerPoint import, see Importing a PowerPoint.
- Import from Storyline - Upload an Articulate Storyline Word export and convert its slides into course pages. Select this option if you want to convert an existing Articulate Storyline course to a Studio course. For information on Storyline import, see Course Studio - Importing from Articulate Storyline.
4. Basing Your Outline on a Template
If you selected Start from a Template, you will see a list of templates for common course topics.
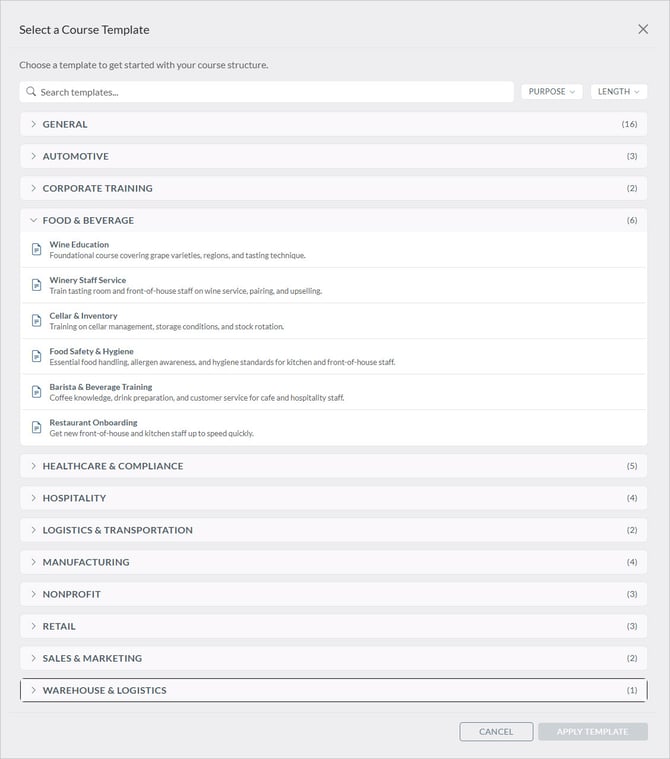
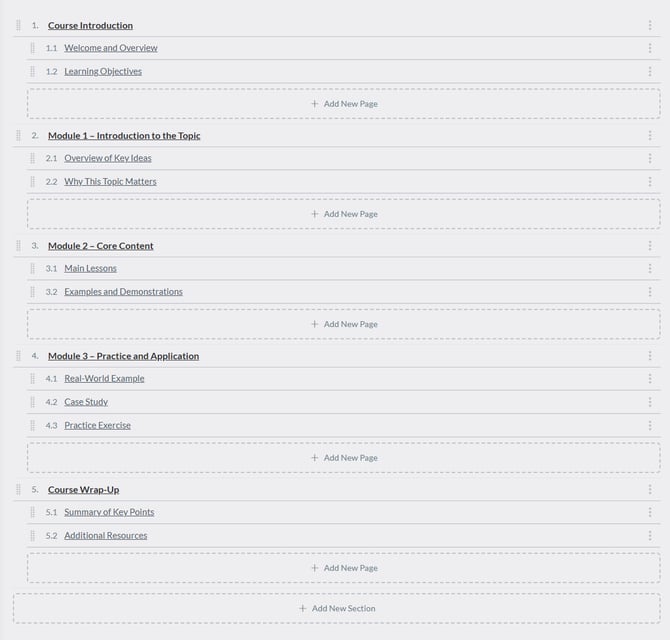
Each template will include a pre-built course outline that you can use as-is or modify. For example, here is the Standard Course Template:
5. Building and Editing Your Outline
If you selected Start from Scratch you will see an empty course outline, giving you full control over the structure of the course.
- Begin by entering the title of the first section.
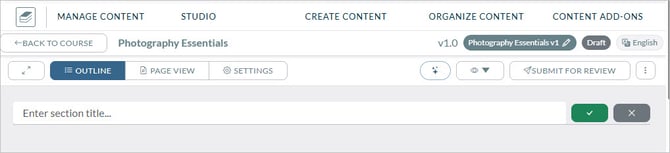
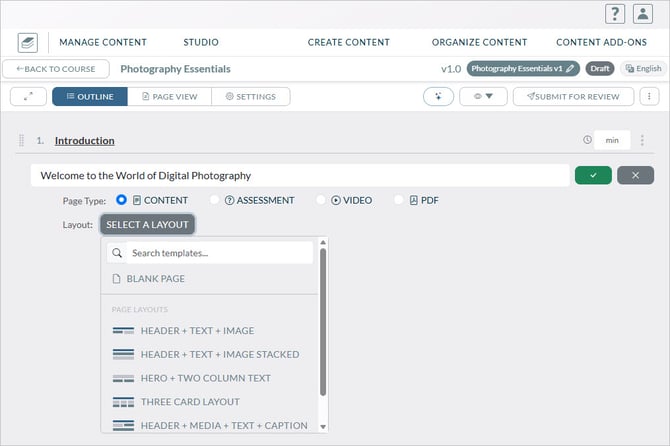
- Then create pages within that section. For each page, you can specify:
- The Page Title
- The Page Type:
- Learning content pages allow you to lay out text and images and upload audio to convey instrutional content. This article will explain how to build Content pages.
- Assessment pages use Knowledge Anywhere's assessment engine to create assessments.
- Video pages present embedded video.
- PDF pages present embedded PDFs.
- The Page Layout. Layouts specify the arrangement of header, text, and images on the learning content pages.
-
You can drag and drop to reorder pages and sections.
-
You can build out as many levels as your course requires.
-
Don't worry about getting the structure perfect right away; you can always reorganize later.
6. Build Your Content Pages
Once your outline is set up, either by starting from scratch or with a template, you can start adding content to each page. Click on any page in the outline to open it in the page editor.
The page editor is a visual, what-you-see-is-what-you-get (WYSIWYG) environment, meaning what you build in the editor closely mirrors what Learners will see when they take the course. Pages are laid out using a grid of rows and columns, and within each column you can add content elements like headings, text, images, buttons, callout boxes, and more.
Selecting a Page Layout for a Content Page
If you are new to Course Studio, we recommend beginning with a predefined page layout.
-
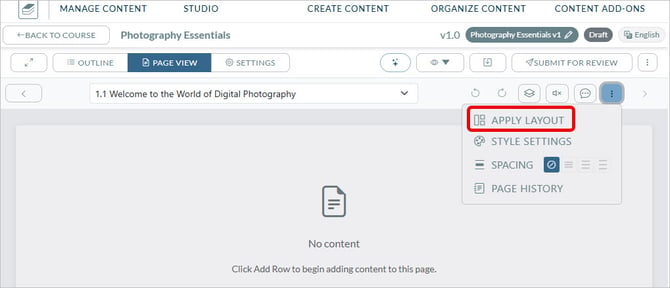
Click the three dots in the upper right and select Apply Layout.
-
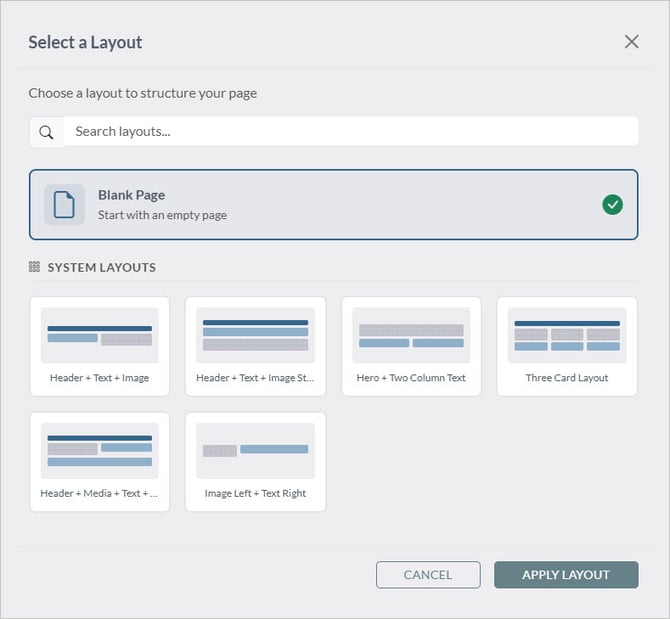
Select your preferred layout.
Modifying a Page Layout
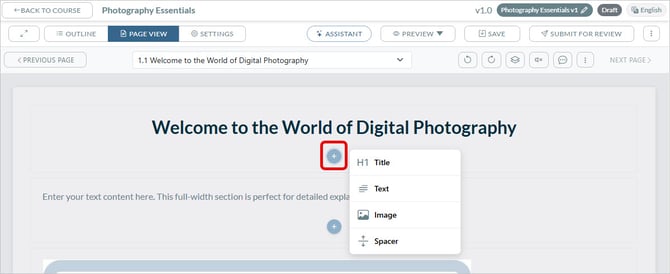
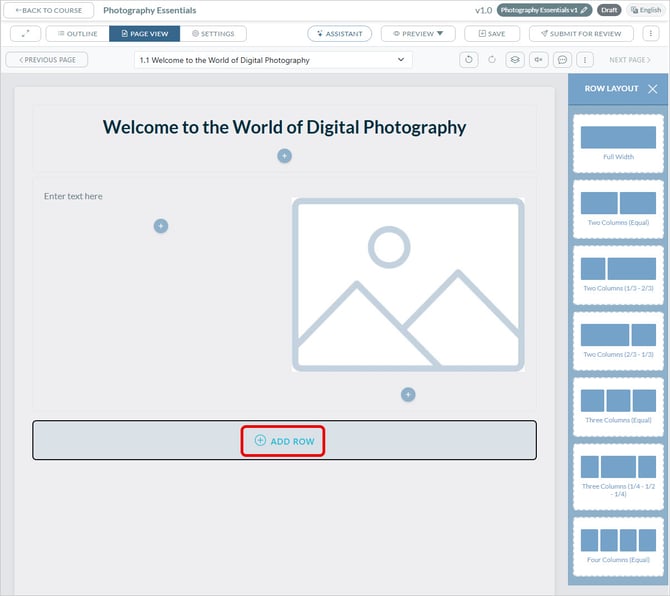
If desired, you can modify your page layout. The layout consists of content blocks, which can include titles, text, images, or spacers.
- Click the plus sign to add a layout element inside a content block.
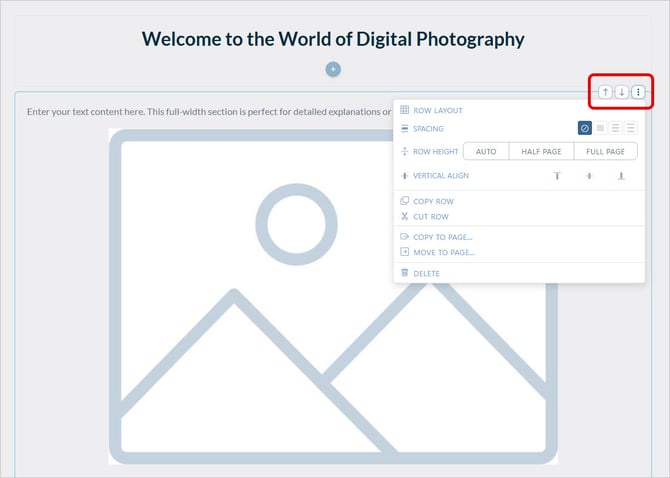
- Click the three dots menu to see controls for the content block. You can move the block up or down, or take other actions from the three-dots menu. You can also copy and move entire rows or individual content elements between pages within the same course, which is useful when you want to reuse a standard element, such as a recurring callout or a consistent footer, without rebuilding it on every page.
- Click inside a text block to see text editing controls.

- Click Add Row to add a row of content elements. A row can include multiple content blocks.
Adding Images
To add an image:
-
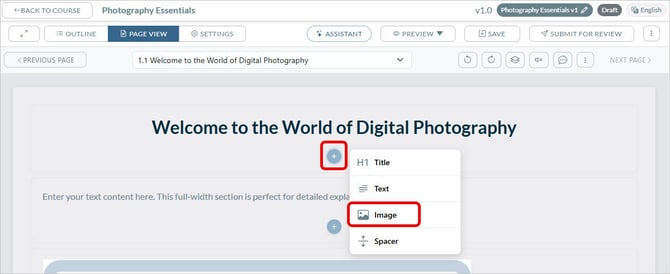
Insert an image page element, click the plus sign then click Image.
-
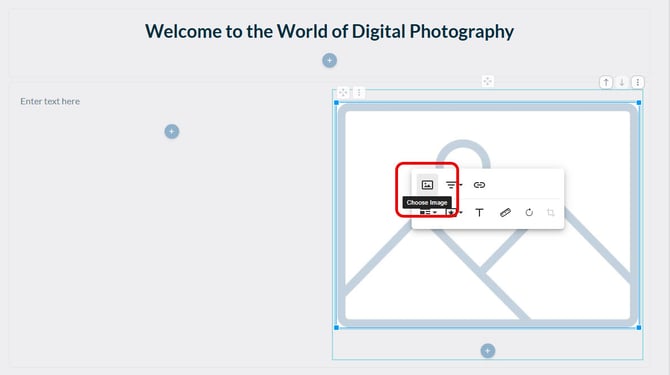
Click the image element you just added, then click Choose Image.
-
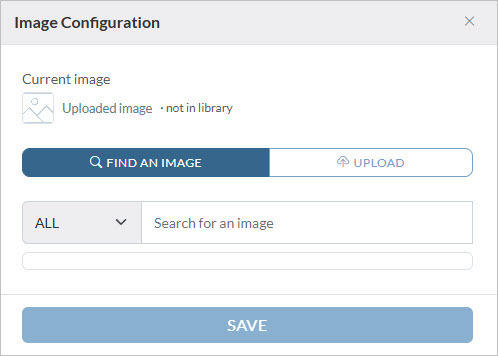
In the Image Configuration dialog box that appears you can select an existing image from the Resource Library or upload an image.
For more information on working with images, see Course Studio - Working With Images
Adding Audio
Audio can be attached to a content page to supplement your written material. for example, a narration track that walks learners through the page content. To add audio:
-
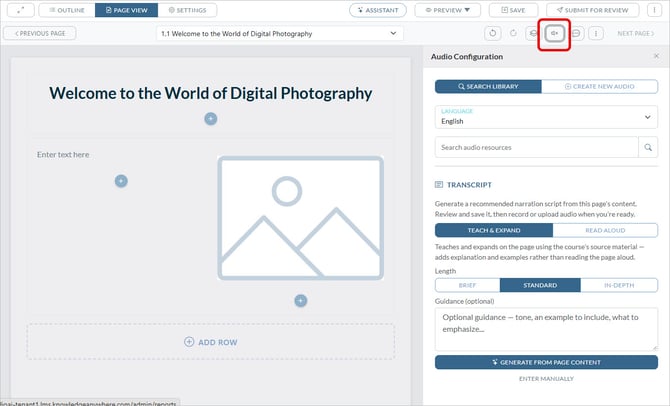
Click the audio icon.
-
Click Search Library to add an audio file from the Resource Library or click Create New Audio to upload a file. MP3 and M4A files are supported, with a 20 mb size limit.
Tip: Save images and audio files your Resource Library for reuse.
7. Add an Assessment
Assessments reside on pages with the Assessment page type. Studio uses the LMS assessment engine to create assessments. For more information, see Assessments Overview.
8. Set Completion Criteria
Before publishing your course, you will want to define what it means for a learner to have completed it. Completion criteria are configured in the course settings and determine when the LMS marks a course as complete on a learner's record.
To set completion criteria:
- Click Settings.
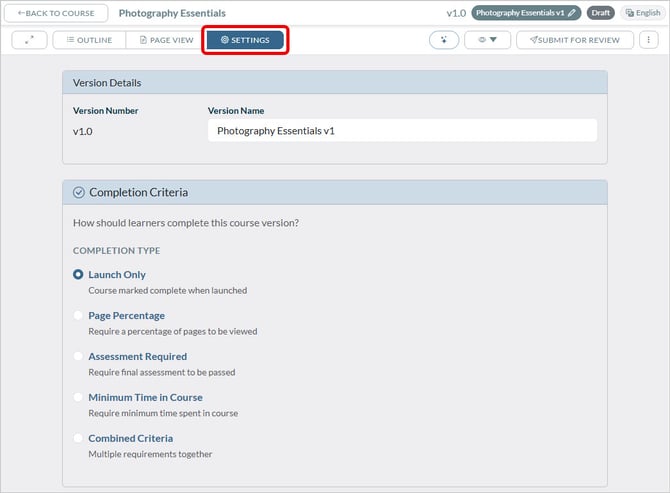
- Select your preferred completion option:
-
- Launch Only - As soon as the course is opened, it is marked as complete.
- Page Percentage - The Learner must view a certain percentage of pages in order to be marked as complete.
-
- Pass the final assessment - Completion is tied to passing the Assessment page marked as the final assessment. The passing percentage is set within the assessment.
-
- Minimum time - A learner must spend a specified minimum number of minutes in the course.
- Combination - String completion types together.
Choose the criteria that best match the goals of your course. For compliance training, you may want to require both full-pagepage view and a passing assessment score. For a lighter informational course, viewing all pages may be sufficient.
We suggest keeping completion criteria as simple as possible and clearly explaining the completion criteria to the learner within the course. Otherwise, learners are likely to fail the course and not understand why, leading to support requests.
Congratulations, you've just created your first course using the Knowledge Anywhere Course Studio!
If you have questions about Course Studio, please reach out to your Knowledge Anywhere Account Manager, or email us at support@knowledgeanywhere.com.