![2617210b577d672136104a4f5660e04f07acf843-removebg-preview.png]](https://help.knowledgeanywhere.com/hs-fs/hubfs/2617210b577d672136104a4f5660e04f07acf843-removebg-preview.png?height=40&name=2617210b577d672136104a4f5660e04f07acf843-removebg-preview.png)
The Course Review process is Course Studio’s built-in quality-control workflow. It pauses a course version between active editing and going live so someone other than the author can verify the content before publication.
This process is especially useful when an organization needs separation of duties between authoring and approval. For example, when a content team creates courses but a compliance, legal, or subject-matter team must sign off before learners can access them.
Each of these steps is covered in detail below.
Table of Contents
1. Administrative Rights and Review Flow
Administrative rights work together with licensing to control authoring rights associated with Studio. In other words, you must be designated the appropriate administration level and be allocated a Course Studio a license to develop courses in Studio. Your default allocation of licenses depends on your LMS tier, and additional licenses can be purchased. Go to Account Management > Licenses to see your allocation and assignments.
To assign your licenses, browse to the user page for the administrator to whom you want to assign the license and verify that they have Editor or Developer administration type. Then click on the Licenses tab and assign a license to them. Remember that you have to assign both the correct administration type and a license. See the table below.
Collaborators (i.e., reviewers) are designated on Courses > Edit Course > Collaborators.
| Role | View | Edit Drafts | Submit for Review | Approve/ Reject |
Publish | Delete | Manage templates & styling |
|---|---|---|---|---|---|---|---|
|
Collaborator |
✅ | ❌ | ❌ | ✅ | ❌ | ❌ | ❌ |
| Developer License: Developer Admin Type: Developer |
✅ | ✅ | ✅ | ❌ | ❌ | ✅1 | ❌ |
| Editor License: Editor Admin Type: Editor |
✅ | ✅ | ✅ | ✅ | ✅ | ✅ | ✅ |
|
Global Admin |
✅ | ❌ | ❌ | ❌ | ❌ | ✅2 | ❌ |
| Microsite Admin License: None Admin Type: Microsite |
✅ 3 | ❌ | ❌ | ❌ | ❌ | ✅3 | ❌ |
1 Drafts only
2 Only the course object
3 Only for their own microsite
A course version has one of four states. The review process governs the transitions in and out of the In Review state.
|
State |
Editable? |
Visible to learners? |
Comments allowed? |
|---|---|---|---|
|
Draft |
✅ Yes (with EDIT permission) |
❌ |
✅ Both Draft and Review modes |
|
In Review |
❌ Locked |
❌ |
✅ Both modes; new comments default to Review |
|
Published |
❌ |
✅ |
✅ Read-only for new comments* |
|
Archived |
❌ |
❌ |
🔒 Read-only; no new comments |
The workflow looks like this:
- Create your course and build your content as a Draft.
- Submit the Draft for Review. The version becomes In Review and is locked from further editing.
- One or more reviewers examine the content, leaves feedback through Review-mode comments, and either:
- Approve it, so it can be published, or
- Reject it, so it returns to Draft for revision.
- Authors address the feedback and update the course.
- The course is approved and published, creating a live version.
- The published course is assigned to Learners.
- When updates or another language is needed, create a new version.
- If a course no longer has use, simply archive the course, that way, completions remain intact.
Draft─submit─▶ In Review─approve─▶(Approved)─publish─▶ Published ─▶ Assigned
   ▲                  │                                        │
   │                  │                                        │
   └──────reject──────┘                                        │
                                                               │
                                                               ▼
                                                           Archived
2. Create Your Course
Every course in Course Studio starts as a Draft. A Draft is a working copy of your course. It is fully editable, visible to Admins with appropriate access, and not visible to Learners. There is no limit to how long a course can remain in Draft, and you can make as many changes as you need before moving it forward. For more information on creating a course, see Course Studio - Building Your First Course.
While building your Draft, take advantage of the tools available to you:
- Use the outline to structure your course into sections and pages before filling in the content.
- Apply page layout templates to give your pages a consistent visual structure without starting from scratch on each one.
- The editor saves your work automatically every few seconds, so you do not need to manually save as you go.
- ✨If you have an Assistant AI for Studio license, use Assistant's AI features to expedite the instructional design process.
Once you are satisfied that the content is ready for another set of eyes, you are ready to move to the next step.
3. Submit for Review
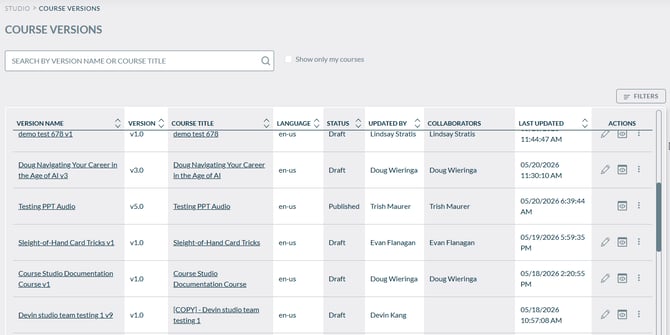
When your Draft is ready, click the Submit for Review button in the version management area. This moves the course from Draft status to In Review status and notifies your designated Reviewers that the content is ready for their feedback.
Once a course is submitted for review, the following things happen:
- The content is locked. A Read-Only status is applied to the course. Editors can no longer make changes to the course while it is In Review. This ensures that Reviewers are looking at a stable version of the content and that no edits slip in mid-review.
- Reviewers are notified. Anyone assigned as a Reviewer on the course receives a notification, both within the LMS and by email letting them know the content is ready for their input.
- The comment mode switches to Review. Any new comments added while the course is In Review are automatically tagged as Review-mode comments, keeping reviewer feedback clearly separate from any earlier internal notes. Review comments are not the same as course comments, which are on the individual course pages.
Note: Only admins with Develop or Edit permissions can move a course into Review. If you do not see the Submit for Review button, contact your LMS administrator to check your permission level.
4. Assign Reviewers
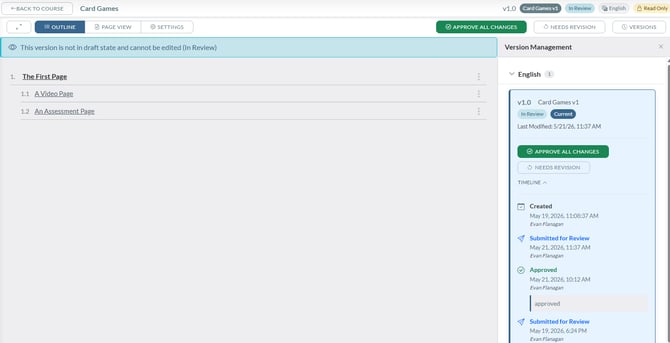
Before you submit your course for review, make sure you have assigned the right people as Reviewers. Reviewers are added on a per-course basis through the Collaborators tab, which keeps your review team specific to the course at hand rather than applying a single global list to everything.
Using the Collaborators Tab
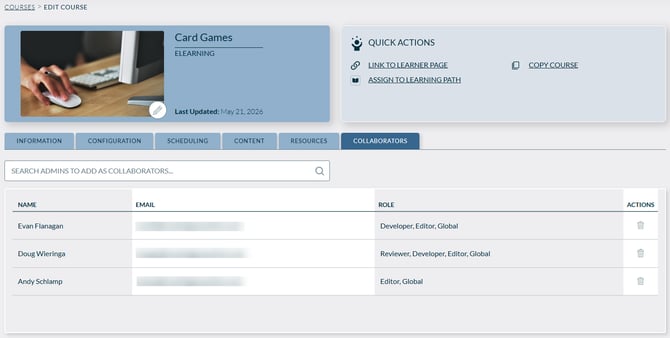
To assign Reviewers to your course, navigate to the Courses > Edit Courses > Collaborators tab. From here, you can search for and add other Admins in your system to the course. Once added as a collaborator, a Reviewer will be notified when the course is submitted for review and will have access to view the content and leave feedback.
Note thot you don't assign collaborators under Studio > Course Versions. Instead, navigate the course itself under Courses > Edit Courses > Collaborators.
The Collaborators tab shows all Admins currently assigned to the course, along with their role. You can add or remove collaborators at any time, even after the course has been submitted for review.
What Admin Rights Are Required to Review a Course?
Not every Admin can act as a Reviewer. To approve or reject a course submission, an Admin needs the Review permission in the LMS. This permission is what allows an Admin to open a submitted course, leave Review-mode comments, and take the approve or reject action. Without it, an Admin may be able to view course content but will not see the controls needed to complete a review.
- Reviewer - The dedicated review role. Reviewers can view submitted content, leave Review-mode comments, and approve or reject a submission. They cannot edit course content or publish courses.
- Editor - Editors have full authoring and publishing capabilities and also hold the Review permission, meaning they can review content as well as build it. This makes Editors appropriate for smaller teams where the same person may both author and sign off on courses.
- Global Administrator - Global Admins can only view, and review the course.
- Developer - Developers can build and submit courses but do not hold the Review permission. They cannot approve or reject their own submissions or anyone else’s.
If the person you want to assign as a Reviewer does not appear in the Collaborators search, they likely do not have the right Admin role set up in the system. Contact your LMS administrator to have the appropriate role assigned before proceeding.
Note: Assigning someone as a collaborator does not change their overall Admin role in the LMS. It simply gives them access to this specific course in Course Studio. Their ability to review, edit, or publish is still governed by the permissions attached to their Admin role.
5. Reviewers Comment on the Course
Once a course is In Review, Reviewers can open the content and leave structured feedback using the built-in comment system. Comments are the primary way Reviewers communicate with course authors during the review process, and they are designed to make feedback clear, organized, and actionable. Comments exist on the individual pages of the course, and are different from review comments.
The Comment Panel
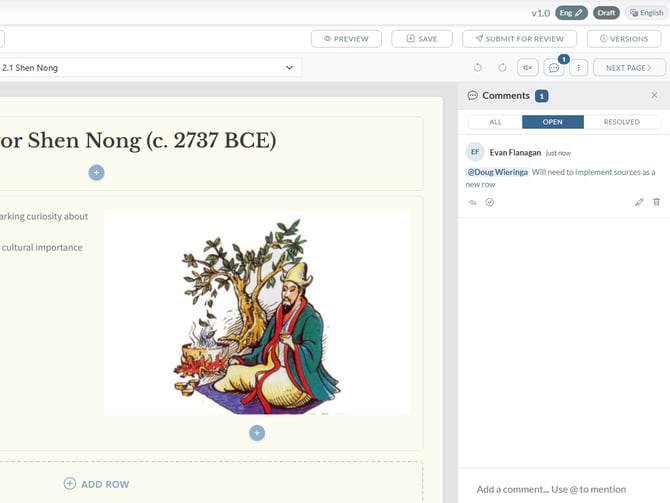
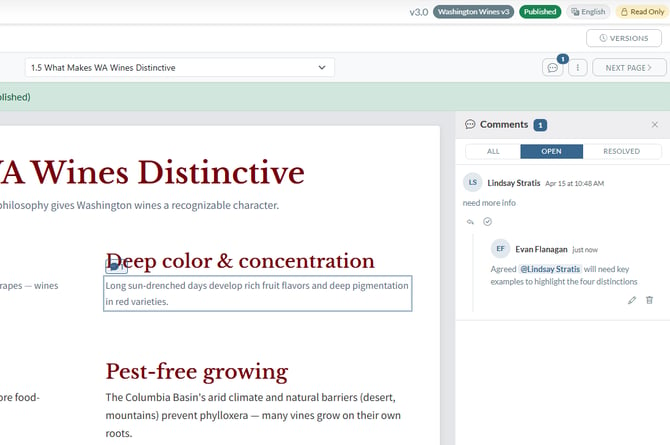
The comment panel opens as a sidebar on the right side of the page editor. Reviewers can access it from any page in the course using the Comments button in the page toolbar. The panel displays all comments left on that page, and authors can navigate between pages to see feedback across the whole course.
Leaving Comments
Reviewers can leave comments at two levels of specificity:
- Page-level comments - General feedback about the page as a whole, such as notes about tone, structure, or missing information.
- Block-level comments - Feedback tied to a specific content element on the page, such as a particular paragraph, image, or callout box. A small comment icon appears next to the element when a block-level comment exists.
Comments support threaded replies, so authors and reviewers can have a back-and-forth conversation within a single comment thread rather than creating multiple disconnected notes about the same issue.
Mentioning Team Members
Reviewers and authors can tag collaborators in a comment by typing @ followed by the person's name. The mentioned user receives a notification alerting them to the comment, which is useful for flagging something to a specific subject matter expert or escalating an issue to a decision-maker.
Approving or Rejecting the Course
After reviewing the content, Reviewers take one of two actions:
- Approve - The review is complete and the content is ready to publish. The course moves forward in the workflow.
- Reject - The content needs changes before it can be published. The course is returned to Draft status and the author is notified. All comments, both internal Draft notes and Review-mode feedback are preserved so the author has full context on what needs to be addressed.
Note: Only users with the Review permission can approve or reject a submission. Editors and Developers cannot approve their own work unless they also hold the Review permission.
6. Address Feedback and Update the Course
If the course is rejected and returned to Draft, it is your job as the author to work through the reviewer feedback and update the content accordingly. The comment panel remains visible while you edit, so you can reference each piece of feedback without switching back and forth between screens.
Working Through Comments
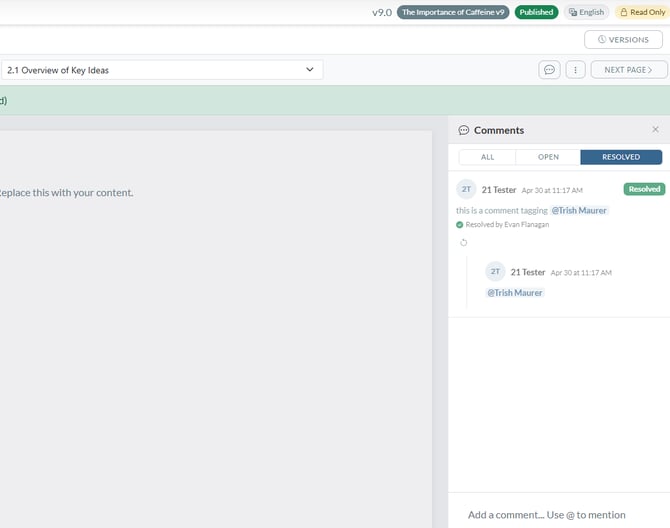
As you address each comment, mark it as resolved. Resolving a comment collapses it in the panel and moves it to the Resolved filter, keeping your view focused on outstanding issues. You can reopen a resolved comment at any time if needed.
- Use the comment panel's filter controls to toggle between All, Unresolved, and Resolved comments.
- Each page in the course outline shows a badge with the number of unresolved comments, so you can work through pages methodically without missing any feedback.
Resubmitting for Review
Once you have addressed all the feedback and updated the course, you can submit it for review again. The process repeats, meaning the version locks, Reviewers are notified, and a new round of Review-mode comments can be added. This cycle can repeat as many times as needed until the course is approved.
Tip: Before resubmitting, check that all comments are either resolved or have a reply explaining your decision. This helps Reviewers quickly see what changed and what was intentionally left as-is.
7. Publish the Course
Once a Reviewer approves the course, it is ready to be published. Publishing makes the course live and available in the LMS. Only users with the Editor admin role can complete this step.
What Publishing Does
When you publish a course, the system creates a published version of the content, which is a snapshot of the course exactly as it was when approved. This published version is what Learners see and interact with. Think of a version as a saved, stamped copy of the course at that point in time.
Publishing also triggers the following:
- The previous version is archived. If a published version of this course already exists (from a previous publish), it is automatically moved to Archived status. Archived versions are kept for historical reference but are no longer live.
- Learners in progress are notified. If any Learners were in the middle of an older version of this course, they will see a notification on their course detail page letting them know the course has been updated and that they will need to start over. Their previous progress is reset.
- The Draft is closed. The version that was reviewed and approved becomes the live Published version. To make further changes, you would need to create a new version (covered in Step 9).
Version History
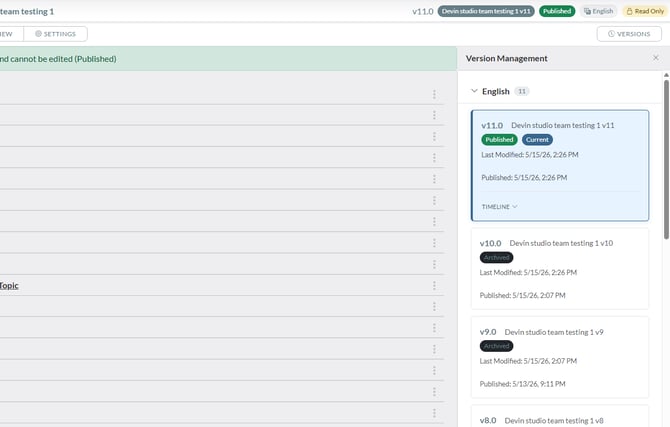
All versions of a course, Draft, In Review, Published, and Archived, are visible in the version management panel. This gives you a complete history of how the course has evolved over time, which can be valuable for audit purposes or for understanding what changed between versions.
Note: Only users with the Publish permission can publish a course.
8. Assign the Course to Learners
Once a course is published, it becomes available in the LMS like any other course. From this point forward, assigning it to Learners works in the same way as any non-Studio course in your system. There is nothing special to configure just because it was built in Course Studio.
How to Assign a Published Course
Published Studio Courses can be assigned to Learners through the standard course assignment tools in your LMS:
- Direct enrollment - Enroll individual Learners or directly into the course from their profile.
- Self-enrollment - Make the course available in the All Learners Group so Learners can find and take the course without having to be qualified via a group.
- Learning Paths - Add the course to a Learning Path in a group so it is automatically assigned to Learners who are enrolled in that group.
- Checklists - Add the course to a checklist to be part of a specific path with other tasks outside of courses.
- Certifications - Make the course part of a Certification path.
Learner Experience
When a Learner is assigned a published Studio Course, it appears on their dashboard and course detail page just like any other course. They can launch it, navigate through the content, complete assessments, and have their progress tracked all within the standard LMS experience.
9. Update the Course
Courses are not always static. Policies change, information becomes outdated, and feedback from Learners may reveal areas that need improvement. When you need to update a published course, you do not edit the live version directly. Instead, you create a new version using the Copy Course function.
Why You Cannot Edit a Published Course Directly
A published version of a course is intentionally locked. Learners may be actively working through it, and allowing edits to a live version would mean those Learners could see partially-updated content mid-course. Versioning protects Learners from a disruptive experience while giving authors the freedom to work on updates in parallel.
Creating a New Version
If you want to revise a course or create a version of the course in a different language, you should create a new version of the course.
To create a new course version:
- Go to Courses and browse to the course.
- Click the Content tab.
- Click Create New Version.
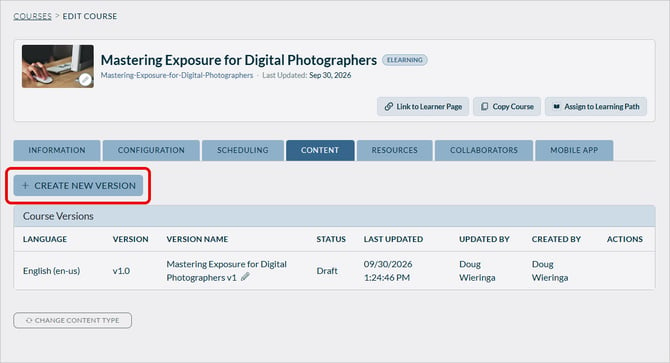
This creates a new Draft version that is an exact copy of the currently published content. The original published version remains live and untouched while you work on the new Draft.
Tip: If you want to use a course as the basis for an entirely new course, then copy the course by selecting Copy from the Actions menu on the course list. This leaves the original course intact and creates a copy of it (but deletes the version history for the copy).
For example:
- If you have created a course on Grilling Chicken and want to use it as the basis for a different course on Grilling Steak, then copy the course and edit the copy. The result will be two different courses.
- If you have created a course on Grilling Chicken and want to update it based on new health standards for safely grilling chicken, the create a new version. The result will be an updated version of the same course.
From here, the process is the same as building any other course:
-
Make your changes in the new Draft.
-
Submit for Review.
-
Address feedback.
-
Publish the updated version.
When the updated version is published, the previous published version is automatically archived, and Learners who were in progress on the old version will be notified that the course has been updated.
Keeping Track of Versions
The version management panel on the Content tab gives you visibility into all versions of a course at any time. You can see which version is currently published, which versions are archived, and whether a new Draft is in progress. This makes it easy to manage the update lifecycle, especially for courses that go through multiple revisions over time.
Tip: When publishing an updated version, use the version notes field to describe what changed. This creates a clear record that helps your team understand the history of the course at a glance.
If you have questions about Course Studio, please reach out to your Knowledge Anywhere Account Manager, or email us at support@knowledgeanywhere.com.