![2617210b577d672136104a4f5660e04f07acf843-removebg-preview.png]](https://help.knowledgeanywhere.com/hs-fs/hubfs/2617210b577d672136104a4f5660e04f07acf843-removebg-preview.png?height=40&name=2617210b577d672136104a4f5660e04f07acf843-removebg-preview.png)
When you import a PowerPoint file, Course Studio reads through the slides and automatically creates a course from them. Each slide becomes a page in the course, the structure follows the deck, and the text, images, tables, audio, and embedded video are pulled across.
The result is a working Draft course with all your slide content already in place. From there, you edit it like any other course in Course Studio — refining pages, adding interactive elements, adjusting structure, and so on.
PowerPoint and Course Studio have different strengths, so don't expect every visual detail to come across exactly. What you get is a strong starting point that's far faster than rebuilding from scratch.
PowerPoint import is a good fit when:
- You already have a PowerPoint deck containing content for the course.
- The deck is mostly content (text, images, simple diagrams) rather than animations or transitions.
- You're willing to spend some time refining the result rather than expecting a polished course on the first try.
PowerPoint import is not a great fit when:
- Your deck relies heavily on PowerPoint animations, transitions, or speaker-driven timing — none of those translate at this time.
- The slides have very complex layouts (overlapping shapes, custom diagrams) that don't map neatly to web pages.
- You want a course that looks dramatically different from the deck — in that case, build from scratch using a template instead.
If you're uncertain, try it. The import is non-destructive: it creates a new course version, and if the result isn't useful you can just delete it and start over.
Importing a PowerPoint
To import a PowerPoint:
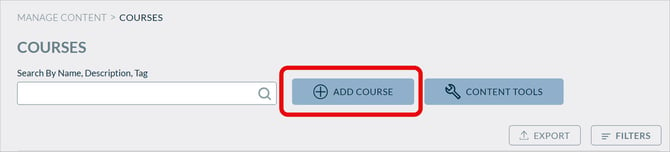
- Go to Courses and click Add a Course.
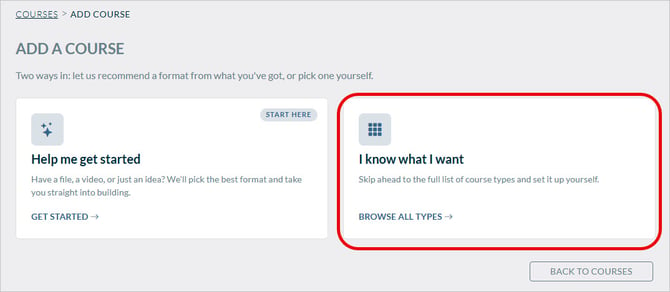
- Because you know you want to upload a PowerPoint, click I know what I want.
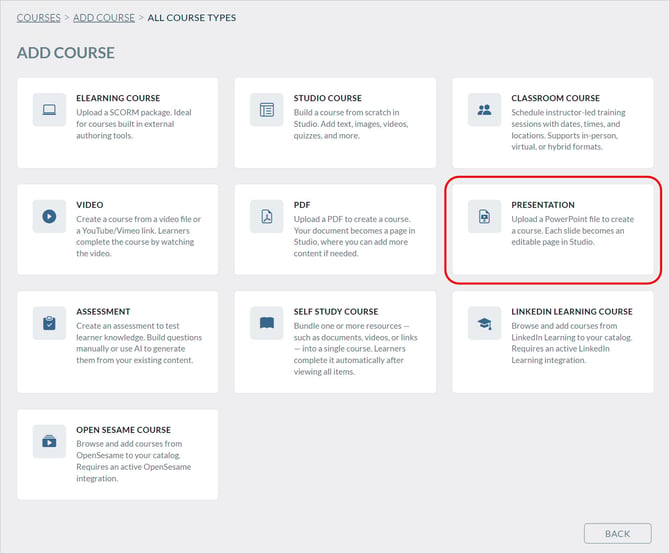
- Click Presentation.
- Enter the foundational details about your course, including:
- Course Title(s) - The name Learners will see in the catalog and on their dashboard. The Admin Title, Friendly URL, and Learner Title will all default to whatever is entered in the Admin Title, and can be different
- Description - A summary of what the course covers. This appears on the course detail page and helps Learners understand what to expect.
- Tags - Keywords that improve searchability within the platform.
- Duration - In minutes, how long the course is.
- You will need to enter a course title, at a minimum, before you can proceed. You can always come back and update this information later, so do not feel the need to have everything finalized before moving forward.
- Upload the PowerPoint.
- Click Create Course. The file will upload. Larger decks take longer to process. Once the upload completes you will see a Studio course based on the presentation in Outline view.
- Edit the course in Studio as desired.
Cleaning Up the Imported Presentation
Importing a presentation will likely save you some time, but you will probably still need to do some cleanup.
The course's overall look comes from your platform's styling configuration — colors, fonts, and branding. So the imported course won't match your PowerPoint's visual design exactly; it'll match the rest of your platform's courses. That's usually what you want, but worth knowing upfront. See Course Studio - Working with Stylings for more on how styling works.
How Slides Map to Pages
Course Studio applies a few rules to translate slides into the course structure:
- Title-only slides (slides that contain a heading and not much else) become section dividers in the outline. PowerPoint's "section header" slide design typically falls into this category.
- Content slides become Standard pages. This is the most common case — text, bullet points, images, and tables all come across as content blocks in the page.
- Slides with embedded video become Video pages. The video itself is preserved and configured automatically; the surrounding slide text is included on the same page.
What gets extracted from each slide:
|
Element |
Imported as |
|
Slide title |
Page title |
|
Body text |
Paragraphs and bulleted lists |
|
Images |
Image blocks |
|
Tables |
Tables (preserved structurally) |
|
Audio clips |
Audio embeds |
|
Embedded video |
Video player on a Video page |
|
Speaker notes |
Not imported |
|
Animations / transitions |
Not imported |
|
Custom fonts and colors |
Not imported (your course uses the platform's styling) |
What You'll Want to Clean Up Afterwards
Once the import finishes, plan to spend some time refining the result. Common things to check and fix:
-
Page titles. PowerPoint slide titles are often phrased for a presentation context ("So Why Does This Matter?") and read awkwardly as page titles in a self-paced course. Rename pages to feel more like a written guide than a slide deck.
- Narration. Slides often skip detail because the presenter was going to fill it in verbally. Imported pages will be missing that detail. Tip: Use speaker notes, if present, as the basis for the audio narration in the course.
-
Layout adjustments. Image-heavy slides may need their layouts adjusted to read well as web pages. Use page layout templates or rebuild rows/columns where it helps. See Course Studio — Styling and Page Layouts for layouts.
-
Section structure. Review the outline and decide whether the sections are sized right. You might want to merge short sections or split long ones.
-
Add assessments. PowerPoint can't capture quizzes, knowledge checks, or interactive elements that learners need. Add quiz pages, callouts, and other interactive blocks where they'd help.
-
Set completion criteria. A new course defaults to Launch Only completion so you may need to set the correct completion criteria. See Course Studio - Building Your First Course.
Using a Slide Image
For highly graphical pages, consider replacing the Studio-editable page with an image of the corresponding PowerPoint slide. From the three-dots menu, click Use Slide Image. If you don't like the results you can toggle back.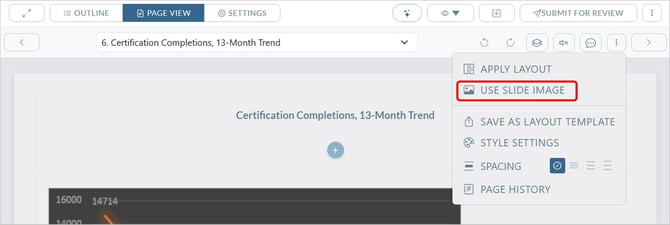
Tips for Good Results
- Tidy the deck before importing. A clean source produces a cleaner result. Take a few minutes in PowerPoint to delete empty slides, fix typos, and make sure section break slides are clearly distinguishable from content slides.
- Keep one idea per slide. Slides that try to fit five concepts onto one page will produce dense, hard-to-read course pages. Splitting them in PowerPoint before import is easier than restructuring after.
- Use clear slide titles. The system uses slide titles as page titles in the outline. Concrete, descriptive titles produce a usable outline; vague or missing titles produce a course where everything looks the same in the table of contents.
- Don't import a finished, polished deck and expect a finished, polished course. Treat the imported course as a Draft you'll refine — because that's what it is.
- Run through the course as a learner. Once you've cleaned things up, click through the course end to end. Pages that read fine in PowerPoint sometimes feel awkward in a self-paced format, and you'll catch those moments by going through it yourself.