- Knowledge Anywhere Help Center
- Learning Management System (LMS) for Administrators
- Learning Path Development: Creating & Uploading Courses
-
Learning Management System (LMS) for Administrators
- Frequently Asked Questions
- Getting Started
- Organization Setup
- Learning Path Development: Creating & Uploading Courses
- Learning Path Development: Organizing Courses & Assigning Learning Paths
- Learner Management: Configuring Learners
- Learner Management: Tracking Learner Progress
- Learner Management: Creating Custom Reports
- Learner Management: Communication & Collecting Feedback
- LMS Site Enhancements
- Helpful Resources
- Systems & Security
-
Learning Management System (LMS) for Learners
-
LMS Integrations & Apps
-
Learning Content Distribution System (LCDS) - Conveyor
-
SCORM Conversion Tool - Scormify
-
Slack App - Quick Quiz
-
Updates & Releases
How do I upload a course image in the LMS?
To enhance learner engagement and promote the course, it is strongly recommended to upload an image for each training course in the visually-oriented Knowledge Anywhere LMS.
To upload a course image
- Open the Administrative Dashboard
- From the Content tab, select Courses
- Search for a course and click on the course name
- On the Course Details page that appears, click the pencil icon next to the course image
- The ADD COURSE IMAGE panel appears
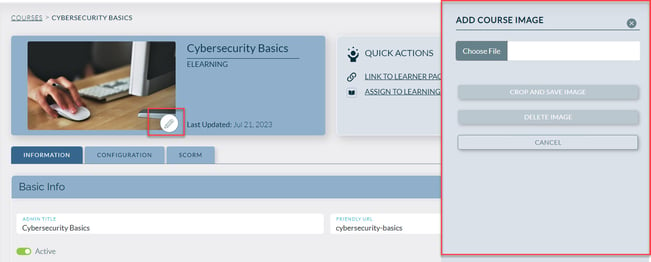
- Click Choose File to select an image file.
Popular graphic file formats are supported.
Note that the minimum size is 400px x 240px. - Click CROP AND SAVE IMAGE
- The new course image should appear on the course detail page, and it also appears on the learner site as part of the course card