-
Add an eLearning Course
An eLearning course is published as a SCORM, a zip package that contains all files needed make an eLearning course. SCORM files are automatically generated when you upload training content such as videos, PowerPoint presentations, PDFs, or Word documents to Knowledge Anywhere’s Scormify program. You then download the zip file and upload it to the LMS's eLearning course. -
Add a Self-Study Course
A Self-Study course is a course that is document-based, such as a PDF workbook, study guide, or job aid. These documents contain content that allow users to master a skill or competency -
Add a Classroom Course
A Classroom course is delivered through an in-person instructor or a virtual instructor (i.e. in a webinar). Classroom courses include a registration feature that allows administrators to monitor and confirm attendance. Classroom courses have two special features: classroom locations and offerings - Add an Assessment
An Assessment course allows admins distribute, control and edit manually-created Assessments, as well as AI Assessments generated from a document or copy-pasted text.
Add an eLearning Course
- Create a course
- Click on the SCORM tab
- Fill in all the required fields
File Label: Enter a name for the SCORM zip file
Languages: Select the language of the online course that you created
Zip File: Select Browse to browse for and then upload the SCORM zip file from your computer.
Note: If you update an existing course with a new SCORM file, users' completion information will not be changed. As part of SCORM Course Version Control, administrators can also keep track of or roll back to previous SCORM file versions.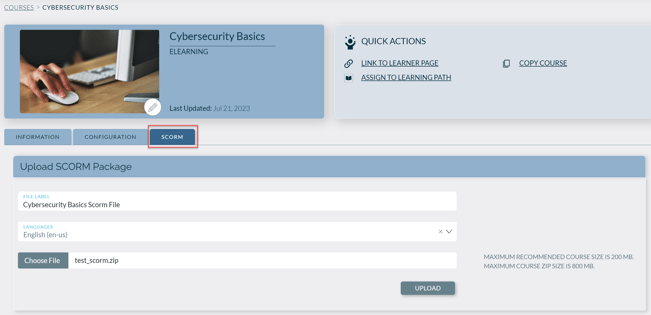
- Click UPLOAD. Large courses may take a few minutes to upload. If you receive the error message “File URL required” you may have an issue with your IMSMANIFEST.xml file.
- After the LMS successfully uploads the SCORM package, click the Launch icon if you’d like to preview the new online course on the Administrative side

Add a Self-Study Course
- Follow steps to add a course (any type)
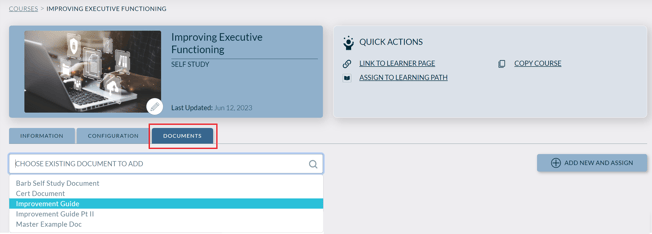
- Click on the DOCUMENTS tab
- If the document is already in the document library, search for it in field: CHOOSE EXITSING DOCUMENT TO ADD
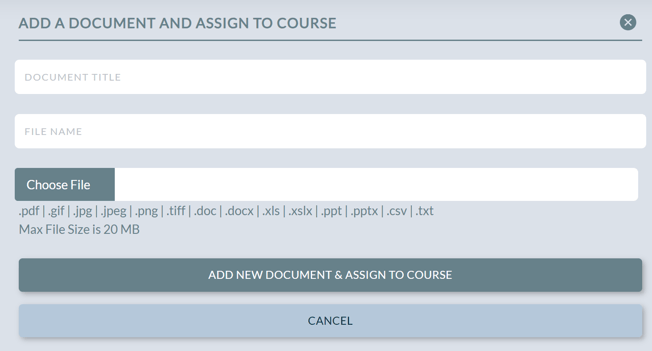
- If the document is not already in document library, click ADD NEW AND ASSIGN, and follow the slide-out panel's instructions, then click ADD NEW DOCUMENT & ASSIGN TO COURSE
- Once documents are staged to be associated to this course, you will see them appear:
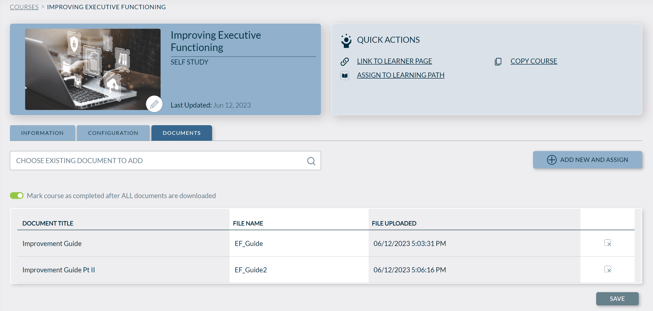
- You can optionally mark course as completed after ALL documents are downloaded, by activating the toggle of the same name. This means once learner downloads all the documents, the course is considered completed.
- Click SAVE to finalize the association of the documents to this course
Add a Video Course
Video courses have many of the same components as online courses but focus strictly on video content
- Video Courses use links to the video
- Completion is on watch percentage
- Create a course, selecting "Video"
- Click on the Content tab
- Fill in all the required fields
Admin Title: The name of the video the learners will see
Video URL: Utilize a link to your video (Only MP4, YouTube, and Vimeo URLs are supported.)
Languages: Select the language the video is for
Completion Percentage: How much of the video the learner needs to be watched to be marked complete.

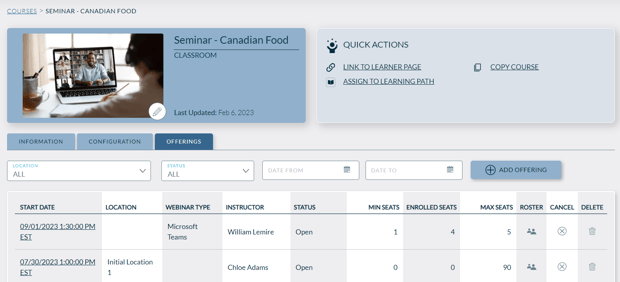
Add a Classroom Course
Classroom courses have many of the same components as online courses with the addition of two features: locations and offerings.
- A classroom location is the physical location of where the class will be held
- A classroom offering is the time slot of when the class will be held at a specific location
Classroom courses can be held at multiple locations and at multiple time slots. For each classroom offering, administrators can specify the instructor, the last enrollment date, the number of seats available, and more. Administrators and instructors can also cancel offerings, view waitlisted learners, and check the enrollment and attendance status of learners.
To add a Classroom Course with an Offering:
- Follow steps to add a course (any type)
- Click on the OFFERINGS tab
- Click ADD OFFERING
- Fill in all the desired fields.
- All the date and time fields are required
- Instructor is required
- You can associate a physical location in the Location field, and/or a Webinar Type. If a Webinar Type is specified, then the webinar link is required
- Click SAVE
- Click Back to Offerings to see it
-
Attached is a helpful classroom course and offering checklist to assist instructors with requesting the creation of classroom courses and offerings to an LMS admin.
Add a Course (any type)
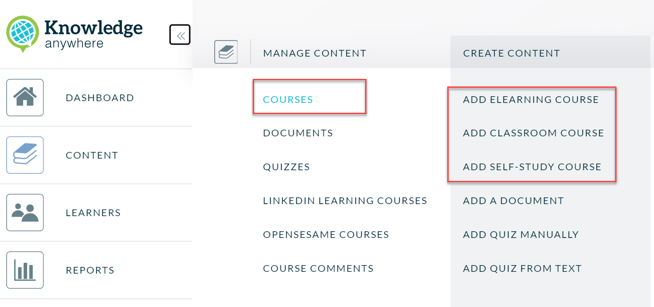
- Open the Administrative Dashboard
- From the CONTENT tab, select COURSES to see a list of course, then click Add Course to select the type of course to add
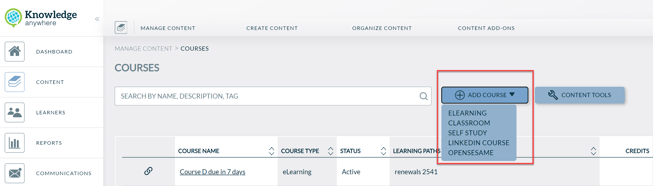
- Alternatively, from CONTENT tab, select ADD [type] COURSE
- Fill in the following basics, and click SAVE
Admin Title: This title is typically the same as Learner title. The LMS uses the Admin Title to automatically create the Friendly URL
Friendly URL: The LMS automatically provides a friendly URL from the Admin Title that you enter.
Active: Deselect this if you want to preview the course before you make it public. Inactive courses do not appear in the user’s learning path (even when assigned) or transcript.
Learner Title: This title shows on the learner site as course title
Description: Optional description for the course that also shows on the learner site
Tags: Optional free-form entry of tags to make your course more search-friendly. Separate tags with commas. Users can then select a tag on a course page to see other courses with the same tag. For example, a course called “Introduction to Golf” might have the tags: golf, sports, introductory.
Duration: Optionally enter the duration of the course (in minutes)
Credits/CEUs: If Credits/CEUs is enabled on your LMS site, can optionally enter the course credits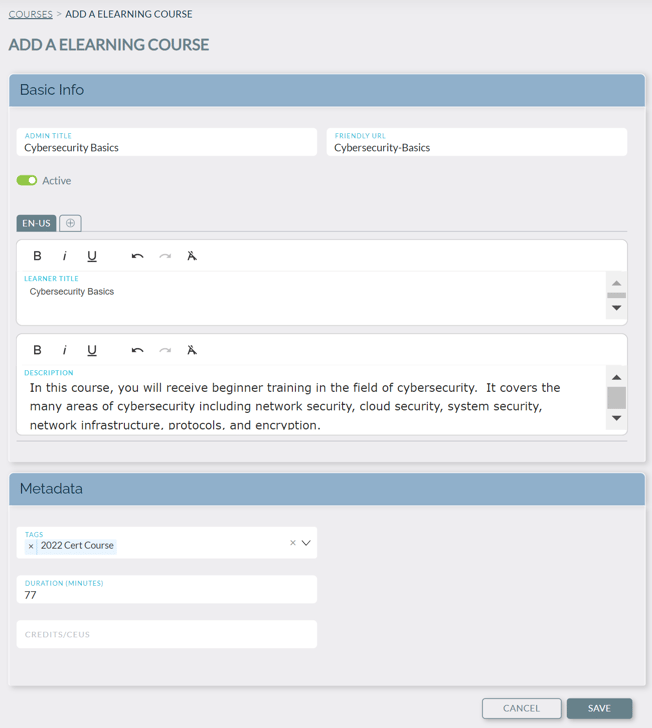
- Optionally enter other course details as needed. Here's how they are organized:
BANNER area:
Course Image: Images are highly recommended to keep the LMS as visually interesting
INFORMATION tab:
Featured On: Select a date to feature the course on a user’s Learning Paths page
Lease Price: Enter a price if you are using the e-commerce feature
Renewal Date: If a course is configured with a renewal date, the user's completion status will reset on the specified renewal date
Due Date: Select a date or date range when learners must take the course
Require Payment: if your LMS includes e-Commerce, select the checkbox if you want to enable e-commerce for the course
Lease Expiration Interval: if your LMS includes e-Commerce, select the amount of time you want a purchase to be valid for
CONFIGURATION tab:
Enable Comments: select this to enable learners to leave comments about the course
Enable Ratings: select to enable learners to rate the course
Require Digital Signature: if your site has digital signature feature enabled, then you can specify whether this course requires the learner to apply their digital signature to attest course completion
You can include a Survey for the learners to take after they have completed the course. If Required for certificate toggle is turned ON, then the learner needs to complete the survey before being able to access the certificate. Surveys help administrators glean valuable feedback from users
Certificate: select a certificate template from the list if you’d like to enable a certificate after the course has been successfully completed by a user. Users can then view, download, and print their certificates
Custom Course Fields: if your site has custom course fields activated and configured, they will appear in the "Custom Course Fields" section as defaults. For each custom course field:
If Visible On Course is turned ON, then the learner sees the field and value on the Course Details page.
If Visible On Certificate is turned ON, then the learner sees the field and value on the Course Certificate.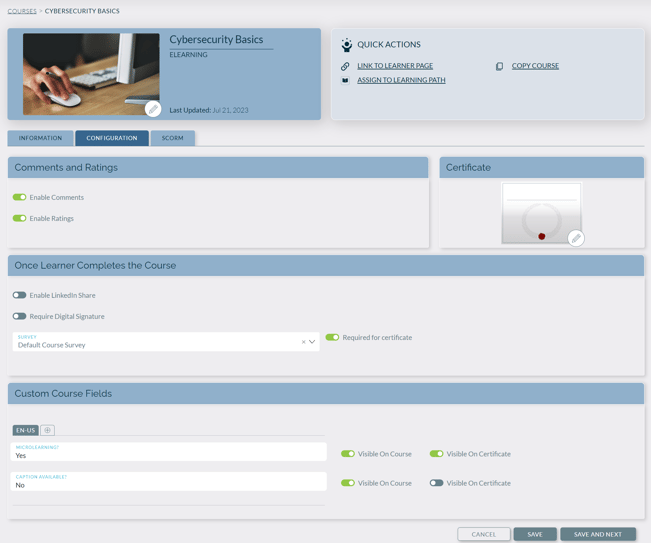
The third tab can be configured, and the content differs depending on the course type. Choose one of the following to configure that third tab:
Manage an existing course
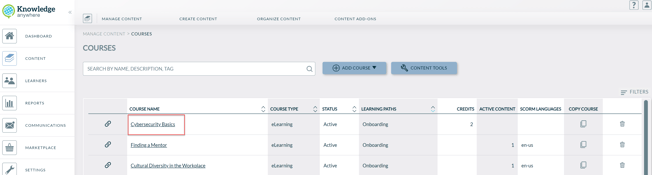
- Open the Administrative Dashboard
- From the CONTENT tab, select COURSES to see a list of courses, then select the course name of the course that you wish to manage
- Make any changes as desired (to see what the various fields mean, see To Add a New Course section above ), then click SAVE