![2617210b577d672136104a4f5660e04f07acf843-removebg-preview.png]](https://help.knowledgeanywhere.com/hs-fs/hubfs/2617210b577d672136104a4f5660e04f07acf843-removebg-preview.png?height=40&name=2617210b577d672136104a4f5660e04f07acf843-removebg-preview.png)
✨This feature utilizes the Knowledge Anywhere Assistant AI for Studio to function
Before you begin: You'll need both Assistant and Studio licenses assigned to your user account. If an AI option appears greyed out, contact your administrator or the Knowledge Anywhere Customer Success team. If you've just been granted a license, sign out and back in before the AI options will appear.
The Assistant takes the materials you give it (uploaded documents, items from your Resource Library, existing Studio courses, or text you type in) and builds a full course from them: an outline of sections and pages, written content for each page, and placeholder assessment pages. You decide how long the course should be, who it is for, what learners should be able to do afterward, and how it should sound.
This article covers the Assistant's course setup screen and the generation process. Once your course has been created, it opens in Course Studio, where you review and edit it like any other Studio course. For information on working in Course Studio, see Course Studio - Building Your First Course.
Table of Contents
- Open the Assistant
- Apply a Preset (Optional)
- Add your Source Content
- Check the Content Sufficiency Indicator
- Set the Content Guidelines
- Create the Course
- Review Your New Course
1. Open the Assistant
There are two ways to start building a course with the Assistant: while creating a new course, or from an existing course draft that has no pages yet.
Start from a New Course
- Navigate to the Courses section of your admin panel.
- Select Add Course.
- Select I know what I want.
- Select Studio Course.
- Enter the basic information for your course, such as the Admin Title and Language. For details on these fields, see Course Studio - Building Your First Course.
- Instead of clicking Create Course, click Next: Studio with Assistant.
The Assistant's course setup screen opens.
Start from an Empty Course Draft
When a Studio course draft has no pages, Course Studio displays a No pages yet screen with options for how to start building. On the Assistant card, click Use Assistant to open the course setup screen for that draft. If you decide you would rather build the course yourself, click Skip — Build Manually on the setup screen. Course Studio opens with an empty outline.
Note: ✨Assistant AI for Studio is only available on Draft versions of a course. If a course has been published, create a new draft to use the Assistant.
2. Apply a Preset (Optional)
If your organization has saved Presets, you can select one from the Preset dropdown at the top of the setup screen. A preset fills in the content guidelines all at once, such as tone, skill level, course length, audience, learning objectives, additional instructions, and assessment options, so courses of the same type are built consistently.

- Every field a preset fills in can still be changed. A preset is a starting point, not a lock.
- If the preset is linked to a course styling configuration, the new course is created with that branding (colors, fonts, and logo) already applied.
- To reuse the settings you have entered on this screen, click Save as Preset.
3. Add Your Source Content
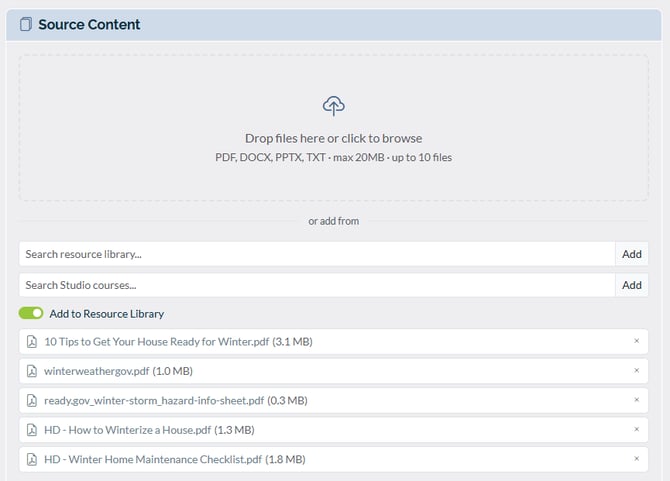
The left side of the setup screen is where you tell the Assistant what to build the course from. You can use any combination of the sources below. The more relevant material you provide, the more closely the course will reflect your organization's own content.
|
Source |
How to Use It |
|
Upload files |
Drag files onto the upload area, or browse to select them. Supported formats are PDF, Word (.docx), PowerPoint (.pptx), and plain text (.txt). You can upload up to 10 files, up to 20 MB each. |
|
Add to Resource Library |
Turn this on to save the files you upload as resources in your Resource Library, so they can be reused elsewhere. |
|
Resource Library |
Search for and select existing resources. You can add more than one. |
|
Existing Courses |
Search for and select Studio courses whose page content you want the Assistant to draw on. |
|
Free Text Content |
Paste or type content directly. Use this alongside your files, or on its own if you don't have documents to upload, for example a topic description or a set of notes. |
|
Additional Instructions |
Tell the Assistant how the course should be structured and presented, the same way you would brief a course designer. For example: “Focus on practical, real-world examples” or “Avoid medical jargon.” |
4. Check the Content Sufficiency Indicator
As you add source content, a color-coded bar estimates whether you have provided enough material for the length of course you have selected.

|
Color |
What It Means |
|
Red |
Limited source material. The Assistant will need to write most of the content itself. |
|
Yellow |
Moderate source material. The Assistant will expand on the content you provided. |
|
Green |
Plenty of source material for the Assistant to work with. |
The indicator is measured against the Number of Pages setting described in the next step, so choosing a longer course will require more source material to reach green.
Tip: Even with plenty of source material, ✨Assistant AI for Studio may add information from its general knowledge to fill gaps. If the course must contain only information from your own materials, turn on Only use supplied content in the content guidelines.
5. Set the Content Guidelines
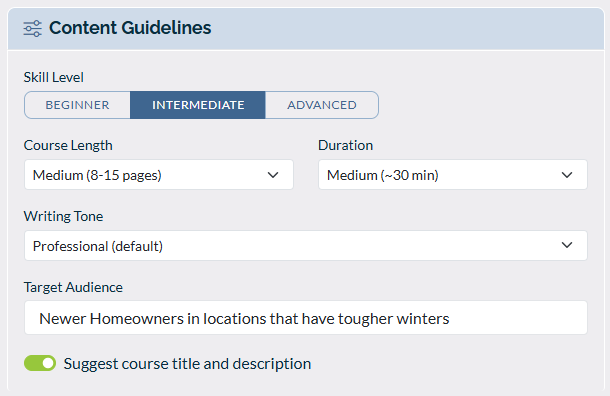
The right side of the setup screen controls how the course is written. If you applied a preset, these fields are already filled in.
|
Setting |
What It Does |
|
Skill Level |
Choose Beginner, Intermediate, or Advanced. Controls vocabulary and how deep the content goes. |
|
Number of Pages |
Choose Auto, Short (5–8 pages, about 15 minutes), Medium (8–15 pages, about 30 minutes), or Long (15–25 pages, about 60 minutes). Determines how many pages the outline includes. |
|
Duration (minutes) |
The total time you expect learners to spend on the course. ✨Assistant AI for Studio sizes the content to fit, at roughly 200 words per minute. |
|
Writing Tone |
Choose Professional, Conversational, Academic, Friendly, or Technical. |
|
Target Audience |
Describe who the course is for, such as “new customer service hires” or “experienced warehouse supervisors.” ✨Assistant AI for Studio tailors vocabulary, examples, and assumptions to this audience. |
|
Learning Objectives |
What learners should be able to do after completing the course. The content is aligned to these objectives. See Adding Learning Objectives below. |
|
Include assessments |
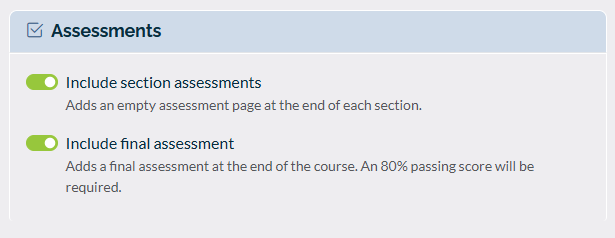
On by default. Adds an assessment page after each section. |
|
Include final assessment |
On by default. Adds a final assessment section at the end of the course. |
|
Only use supplied content |
Restricts the Assistant to your source material only, with no outside information. |
|
Suggest course title and description |
Lets the Assistant write the course title and description based on the content. |
Adding Learning Objectives
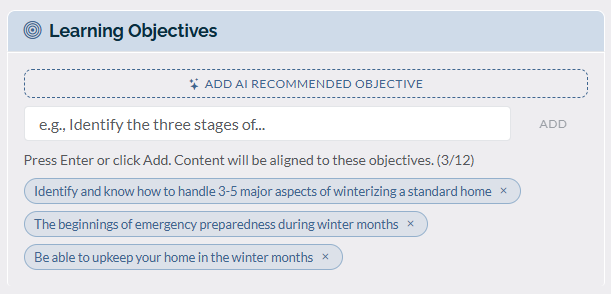
- Type an objective in the Learning Objectives field.
- Press Enter to add it. Each objective appears as its own chip.
- Repeat for each objective. To remove one, click the x on its chip.
If you aren't sure where to start, click Add AI Recommended Objective. ✨Assistant AI for Studio reviews your source content and suggests one objective, which you can keep, edit, or remove. Click it again for additional suggestions.
The Assistant creates assessment pages, but it does not write the questions during course creation. After the course is created, you can configure each assessment page, including generating questions from the course content.
6. Create the Course
When your source content and guidelines are set, click Create Course.
A progress screen shows the ✨Assistant AI for Studio's work as it happens. It builds the course outline first, then writes the content section by section, with a counter showing which section it is working on. Before the course opens, the Assistant also reviews the finished content as a quality check and may revise or add pages.
Generation time depends on the length of the course and the amount of source material. Longer courses can take several minutes. Generation runs on Knowledge Anywhere's servers, so if you close your browser tab, the course continues to build and you will receive a notification in your admin Messages when it is finished.
When generation is complete, Course Studio opens with your new course.
If Something Goes Wrong
|
Message |
What to Do |
|
Content generation failed for one or more sections |
The course is still created, and every page in the outline is still there. The listed sections are missing content. You can generate content for them with the Assistant in Course Studio, or write it yourself. |
|
Source material was flagged by the content filter |
Something in your uploaded files or selected resources was blocked by the content safety filter. Review your source material, remove or replace the flagged item, and try again. |
|
Text flagged as potentially harmful |
Something typed into a text field, such as Free Text Content, Additional Instructions, or Target Audience, was blocked. Review and revise the text, then try again. |
|
Outline generation failed. Please try again. |
✨Assistant AI for Studio could not build the outline. Click Create Course again. If the problem continues, contact Knowledge Anywhere Support. |
|
AI course generation is not enabled. |
✨Assistant AI for Studio has not been turned on for your site. Contact your Knowledge Anywhere Customer Success representative. |
7. Review Your New Course
✨Assistant AI for Studio produces a complete first draft, but you should always review it before publishing. When the course opens in Course Studio:
- Read through the outline and each page, and edit anything that needs adjustment.
- Check the Content Sources for each page in the Assistant panel to see whether the content came from your source material, from cited web sources, or from the Assistant's general knowledge.
- Configure the questions for each assessment page.
- Publish the course when it is ready.
For information on working in Course Studio, see Course Studio - Building Your First Course
Tips for Best Results
- Give the Assistant your real material. Policies, manuals, and existing training produce courses that reflect how your organization actually works.
- Write specific learning objectives. “Identify the three steps of the escalation process” gives the Assistant much more direction than “Understand escalations.”
- Aim for yellow or green. If the sufficiency indicator is red, add more source material or choose a shorter course length.
- Use Additional Instructions for anything specific. Terminology to use or avoid, examples to include, or how formal the course should feel.
- Save settings you will reuse as a preset. This keeps courses consistent and saves time on the next one.
Ready to enable ✨Assistant AI for Studio and/or Studio, or have questions about creating courses? Reach out to the Knowledge Anywhere Customer Success team for help with access, licenses, and next steps. We're here to help you get started.