Courses serve as the core of learner development within the Knowledge Anywhere LMS. The platform supports diverse course formats, enabling administrators to design targeted, engaging learning experiences that enhance knowledge retention. Below, you'll find a detailed overview of course types, steps for creating new courses, and tools for managing and customizing courses.
Types of Courses
The following course types are available in the Knowledge Anywhere LMS:
- eLearning Course – Allows for Scorm format interactive eLearning.
- Self-Study Course – Used for ensuring learners obtain, view, and download important resources.
- Classroom Course – Created offerings for ILT events.
- Assessment Course – Utilizes assessments to provide knowledge checks in order to ensure retention.
- Video Course – View a video link within the course and ensure it's watched in full.
- LinkedIn Course - If LinkedIn Learning is integrated into the LMS, add courses from its catalog to the LMS.
- OpenSesame Course - If OpenSesame is integrated into the LMS, add courses from its catalog to the LMS.
Contact your Knowledge Anywhere account manager or support for more information on LinkedIn Learning and OpenSesame integrations.
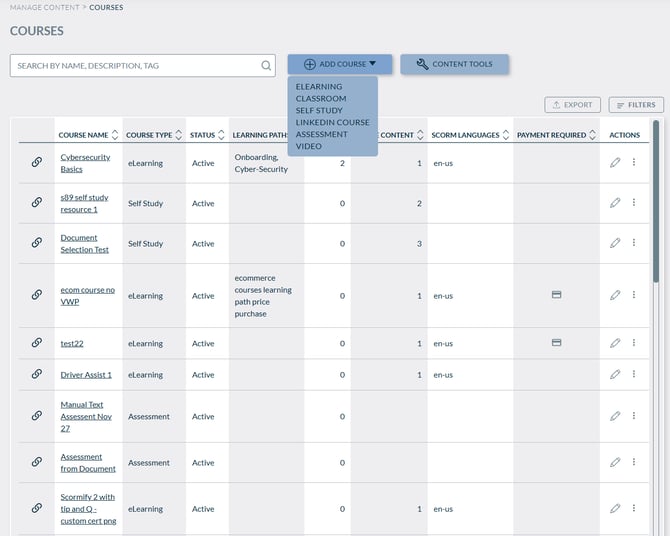
Creating a Course
1. All Courses are created via the same method:
- Open the Administrative Dashboard.
- From the CONTENT tab, select COURSES to see a list of course, then click Add Course to select the type of course to add.
- Alternatively, from CONTENT tab, select ADD [type] COURSE.
2. Fill in the following basic details:
Required:
- Admin Title: The Admin Title is what the course is called to Admins. The LMS uses the Admin Title to automatically create the Friendly URL and Learner Title.
- Friendly URL: The LMS automatically provides a friendly URL from the Admin Title that you edit.
- Learner Title: This title shows on the learner site as course title.
Note: The Admin Title, Learner Title, and the Friendly URL do not have to be the same thing.
Optional:
- Active: Deselect this toggle if you want to preview the course before you make it public. Inactive courses do not appear in the user’s learning path (even when assigned) or transcript.
- Description: Description for the course that is displayed on the learner site. HTML-format configurable.
- Tags: Free-form entry of tags to make your course more search-friendly. Separate tags with commas. Learners can then select a tag on a course page to see other courses with the same tag. For example, a course called “Introduction to Golf” might have the tags: golf, sports, introductory.
- Duration: The duration of the course (in minutes).
- Credits/CEUs: If Credits/CEUs are enabled on your LMS site, can enter the course credits
Saving will create the course. - Admin Access (Global Admin Only): Allows the Course to be associated to specific microsites and managed by Microsite Admins.

3. Click SAVE at the bottom to create the course.
Course Management and Customization
After creating the course, you will be routed to the course itself, which offer a myriad of options to customize and configure the course. This article uses an eLearning Course for reference.
Course Image:
There is an option to upload a custom course image, which is Images highly recommended to keep the LMS as visually interesting. The Knowledge Anywhere LMS provides a different stock image per course type by default, and this default can be changed in the site personalization settings.
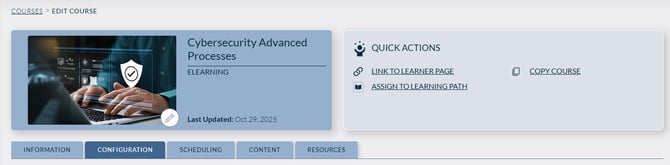
Quick Actions:
- LINK TO LEARNER PAGE - Allows an admin to view the course as a learner would see it.
- COPY COURSE - Creates a full copy of a course, with [COPY] - at the beginning of the admin title and URL
- ASSIGN TO LEARNING PATH - Selects a learning path to assign the course to.
Course Tabs
All courses will normally have an Information, Configuration, Scheduling, Content and Resources tab available. Here's how they are organized:
INFORMATION tab:
The basics that were offered during the course creation (seen above) will be present here, and editable.
CONFIGURATION tab:
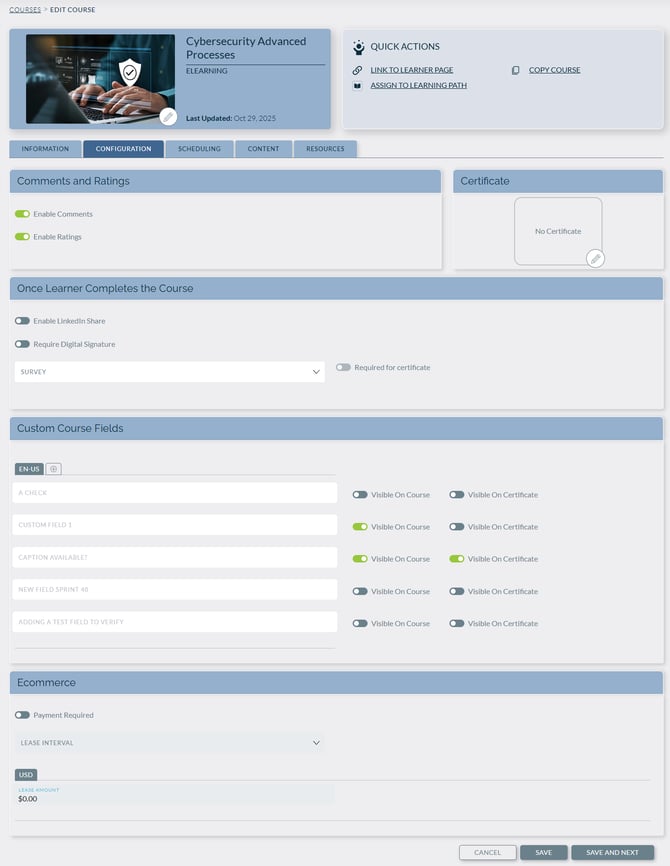
Comments and Ratings:
- Enable Comments: Select this to enable learners to leave comments about the course. Comments must be approved by an Admin to be visible to Learners.
- Enable Ratings: Select to enable learners to rate the course.
Once Learner Completes the Course:
- Enable LinkedIn Share: Allows learners to share completion to their LinkedIn feed.
- Require Digital Signature: if your site has digital signature feature enabled, then you can specify whether this course requires the learner to apply their digital signature to attest course completion.
- Survey: You can include a Survey for the learners to take after they have completed the course. Surveys help administrators glean valuable feedback from learners.
- If the Required for certificate toggle is turned ON, then the learner needs to complete the survey before being able to access the certificate.
Certificate:
Select a certificate template from your list of Certificates if you’d like to enable one after the course has been successfully completed by a user. Users can then view, download, and print their certificates.
Custom Course Fields:
If your site has custom course fields activated and configured, they will appear in the "Custom Course Fields" section as defaults. For each custom course field:
- Visible On Course is turned ON, then the learner sees the field and value on the Course Details page.
- Visible On Certificate is turned ON, then the learner sees the field and value on the Course Certificate.
Ecommerce (If enabled):
- Require Payment: if your LMS includes e-Commerce, select the checkbox if you want to enable e-Commerce for the course.
- Lease Interval: if your LMS includes e-Commerce, select the amount of time you want a purchase to be valid for
- Lease Amount: Enter a price for the course.
Scheduling Tab:
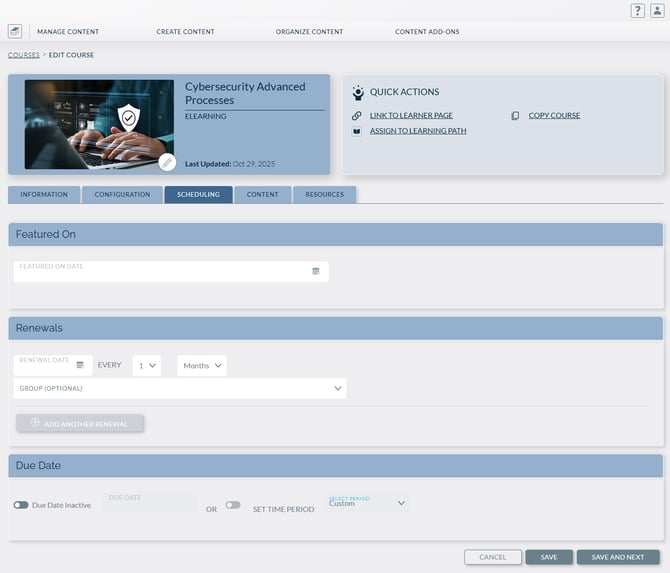
- Featured On: Select a date to feature the course on a user’s Learning Paths page
- Renewals: If a course is configured with a renewal date, the user's completion status will reset on the specified renewal date.
- Renewals are also configurable by group, allowing different renewal dates for different groups
- Due Date: Select a date or date range when learners must take the course
- Retakes (Assessments Only): Dictate a cooldown time between assessment attempts.
Content Tab:
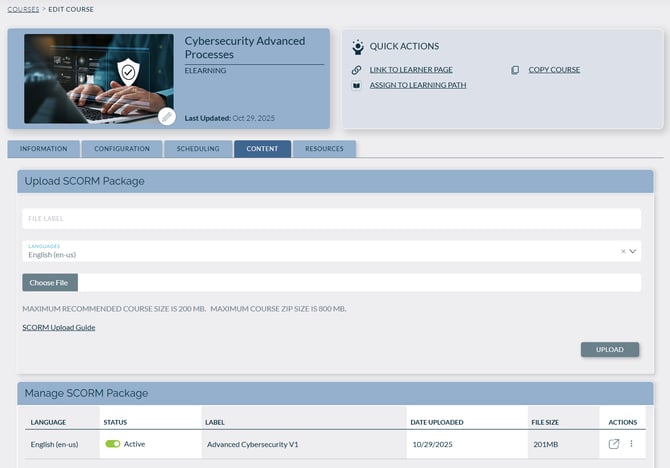
The content tab contents are dependent on the course type. It provides unique configuration option based on the course type:
- eLearning – used to upload, manage, and review Scorm Files. The content tab for an eLearning course is seen above.
- Self-Study – used to apply resources for the course.
- Classroom – used to add offerings for ILT events
- Assessment – used to create and configure an assessment.
- Assessments will have an additional tab, used for configuring the assessment experience.
- Video – used to add and configure the video attached to the course
Resources Tab:
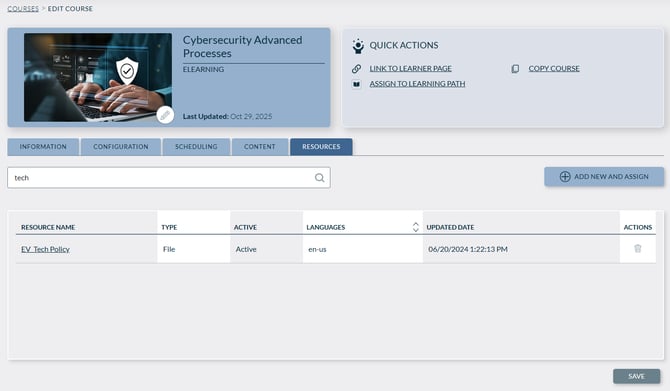
Resources can be assigned to the course as an optional, supplemental material to the course.
- Note: Resources are not available for Self-Study
- Note: In all course types except Self-Study, the interaction of resources is currently not applied towards the completion of a course.
If you have any questions or details on courses, please reach out to support@knowledgeanywhere.com.